Miz Gee's Kitchen
  • Making stuff, eating stuff.

Miz Gee's Rich Vanilla Creme Brulee

6/2/2014

1 Comment

 
Miz Gee's Rich Vanilla Creme Brulee -- www.mizgee.com
A few weeks ago Honey and I had dinner at a french bistro. We had routinely walked past it in favor of other, more familiar restaurants since it opened about 3 years ago. In a fit of adventurousness we decided to give it a try. We walked in and the hostess had a rather strong accent such that I had some trouble understanding her. Then our waiter had an accent and I could hear wisps of Gallic conversation coming from the kitchen. Wow! This place actually is staffed by real French people! The food was wonderful: pork for him, duck confit for me (we all know how much of a fan of duck I am). The wine pairings were impeccable, but what truly stood out for me was the crème brulee. 

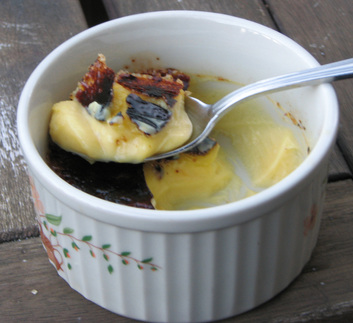
This dessert was smooth, silky, with more of a custard quality to it than other crème brulees (cremes brulee?) I’ve had before. This crème brulee blew away all the others I’d ever tasted. As I spooned the custard reverently into my mouth I became convinced that the key was a higher egg to cream ratio than “ordinary” “american” cremes brulee, such as those served in steakhouses. Yes, a quality steakhouse can serve a fabulous crème brulee, but this one was a revelation. These French people know their business.

Oh, and I had promised you a food high in vitamin D. This is it! Aside from oily fish (which make dubious dessert ingredients) and artificially enriched dairy, egg yolks naturally contain vitamin D. Crème Brulee, the most delicious health food around!                 Click to read more -------------------->


Read More
1 Comment

Honey's Roast Birthday Duck

5/19/2014

6 Comments

 
Picture
Birthday duck, birthday duck, it's the best day of the year girl! Last week I mentioned the wonderful dinner Honey and I prepared for my most recent birthday. The centerpieces of the meal were a goose and a duck. "Why that combination?" I hear you asking. Honey and I had recently discovered a megamart near us that carries these fowl as a standard part of their stock. Never having cooked and eaten goose before, we thought my birthday offered a dandy opportunity for experimentation. We acquired one of each due to the fact that 2 geese would have been too much for the number of guests we anticipated. As it happened this was a lucky accident. 

While the goose was very handsome and stuffed with a scrumptious wild rice dressing (Honey and I like to live on the edge), the meat was tough. It was flavorful, of a dark hue reminiscent of red meat, and definitely required a patient set of choppers to consume. Everybody present nodded graciously over their servings of tough bird while hacking with their knives. In testimony to its toothsomeness the gallant goose was soon reduced to its natural armature... which I later used as the basis for a stock. Our conclusion after the meal was that goose is the mutton of fowl.  Ah well, now we know.

Without a doubt, the duck was the jewel in the crown of our meal. Everybody got at least a taste, and as the birthday girl I ate the drumsticks. When I had my first bite I believe my first words were, “Oh my god, Honey! Mmm, oh my god.” Yes, sampling my Honey's cooking is a near tantric experience. 

How to describe this duck? It was moist and literally dripped juice when carved. The flesh was more tender than a kitten sleeping nestled in the palm of your hand. The glaze was a balanced combination of sweet, salty, and spicy that produced a pleasant tingle and complemented the meat rather than candying it. The result was glorious. Ah, my loves, and oh, my friends you will be moved when you taste this bird. You will swoon, you will weep, you will slap yo mama. Honey and I immediately agreed that we should make this dish more often.

Read More
6 Comments

First loaves of Sour Dough Bread

5/24/2013

0 Comments

 
Picture
Hello everyone. I baked my first sourdough loaves and while the bread was tasty (especially slathered with some nice salted butter) I think it was more valuable as a learning experience. 
The recipe I followed is more like a formula and is known as the 1, 2, 3 formula on several websites. It was devised by a French food blogger named Flo Makanai, who introduced it to American sourdough bakers out of curiosity to see if her formula worked with american style flours. You may see her original post in English here: http://www.thefreshloaf.com/node/9346/123-easy-formula-sourdough-bread

A few bakers have tried her formula, but the one whose example I followed was blogger and baker Shiao Ping on sourdough companion. http://sourdough.com/recipes/home-bread

As a novice sourdough baker I still have quite a bit of learning to do. The main question for me is regarding the timing of feeding the starter and then using the starter. For this initial attempt at baking I decided to just use my starter pretty much straight out of the fridge. I had fed it on Wednesday night and I was baking on a Saturday. That morning I had to go run some errands, so I pulled the liquid starter out of the fridge and let it sit on the counter for a couple hours while I was out. When I returned home I decided to make two loaves, one using the liquid starter and one using the sponge starter. Hence, the sponge starter did not get a chance to come up to room temperature before I used it.

I wanted to make 1.5 pound loaves, so using the 1,2,3 formula the ingredients were as follows for each loaf:

4 ounces by weight starter 
8 ounces by weight warm water
12 ounces by weight whole wheat flour (I used Bob's Red Mill)
1 generous teaspoon salt (I used Real Salt)

Hence forth all steps were carried out twice, once for Dough 1 (liquid starter) and again for Dough 2 (sponge starter).

I stirred up the liquid starter and weighed out 4 oz. and poured 8 oz of warm water on top. I stirred that up until it was a thin slurry and then mixed in the flour. I covered it and set it in my oven with the light on for half and hour. This is the "autolyse" period, where the goal is for the flour to absorb the liquid.

I did the same for the sponge starter (which I believe is 75% hydration) except I had to cut it into little pieces and then smush it in the water with my fingers. 

After half an hour I did some stretch and folds of the dough within the bowls. I did not count how many, but I did it until it seemed to resist. I oiled the bowls, turned the doughs, covered and stored in the oven.

Every hour for 3 hours I stretched and folded the doughs, but I think I was too rough and ended up kneading out most of the gas bubbles.  Dough 1 was softer and easier to stretch, while Dough 2 retained more of its shape and it was easy to see the folds. They both rose and had nicely sized bubbles.

At the end of the 3 hours I let the doughs sit for another half hour, Then shaped them into batards. I don't have any fancy proofing baskets, so I just used a couple plastic containers and lined them with floured cotton cloth. The batards proofed for a final two hours.

At this point I realized I had deflated my dough and that the final proof was probably not going to restore the rise. Ah well.

When It was time to bake I preheated my oven to 500 degrees with an old pan in the bottom.  I placed the batards on a cookie sheet, slashed them down the middle with a razor, and measured out a cup of water. I slid the cookie sheet into the oven, threw the water at the hot pan in the bottom, sloshed most of the water onto the floor of the oven, and shut the door.  I lowered the heat to 450 degrees and baked the loaves for 35 min. I pulled them out, checked the temperature with a probe thermometer and they measured 211 degrees. My target was 200, but 211 is acceptable.

I let the batards sit for 3 hours before slicing them. 
Picture
Assessment:
The bread had a very dark brown crust and a very dense crumb. The batard from Dough 1 was flatter than the one from Dough 2. The flavor was identical. The bread was hearty and not sour, which is fine with me. I prefer less sour bread. The crust was crunchy and chewy. Batard 2 had a better tear at the slash when baked, but both loaves cracked at the edges. I don't know if that is because I didn't slash deep enough, or if I baked it at too high a temperature.
Picture
Next time I will be more careful when stretching and folding. I also will feed up the starter more before baking. I also might try baking the loaf in a dutch oven, or using ice cubes in the oven for steam, rather than water. 
0 Comments

    About the Author

    Miz Gee is a lover of food, cooking, and crafting. She lives in the fantastic San Francisco Bay Area.

    Picture

    Archives

    June 2014
    May 2014
    June 2013
    May 2013
    April 2013
    March 2013

    Categories

    All
    Baking
    Desserts
    Drinks
    Duck
    Eggs
    Fat
    Fowl
    Glaze
    Irish
    Kale
    Main Course
    Meat
    Potatoes
    Roast
    Sides
    Sourdough
    Travel
    Vanilla

    RSS Feed


Powered by Create your own unique website with customizable templates.